
Limited Time Offer
Skyrocket your store traffic with automated blogs!

Getting started
Guide for using Trafficontent
To get started with Trafficontent's blog auto-posting, follow these steps:
- Connect Shopify or create your account using your email and password.
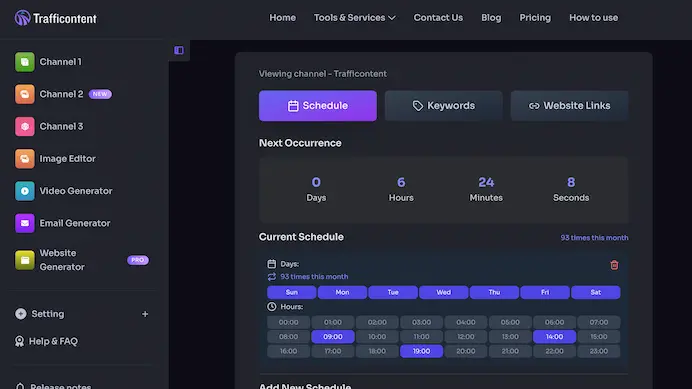
- After login, you will be redirected to your dashboard where you can manage your schedule and channels.
- Click "Connect Shopify" or "Add New Channel" to set up a new website or blog integration such as Shopify or WordPress.
- Fill out the required details like website link, API keys, keywords, and a schedule.
- Once your schedule is set, our system will automatically generate and post content to your site.
- You can monitor posts, edit instructions, pause schedules, and add more channels anytime from your dashboard.
Kickstart in 3 Steps
Create a channel Customize Let auto-posting do the rest
Step 1
Create a channel by connecting your website
Use Auto Install (Shopify or WordPress) or connect manually with your domain and API keys. No site yet? Choose Trafficontent to start posting on a hosted blog.
Step 2
Customize keywords and schedule
Tune your topic keywords, set post frequency, and pick hours and days. Our scheduler aligns with your audience time zones.
Step 3
Auto-posting begins
We generate and publish at your scheduled times. Review results anytime in your dashboard.
- Posts land on your site automatically
- Social fan-out (X / Facebook / Instagram / LinkedIn / Pinterest)
- View content and logs in "Posts"
How to Keep Your Content Fresh and Varied
Since Trafficontent's AI learns from your keywords and schedule, it naturally gravitates toward the strongest patterns you provide. If your keywords or posting frequency are too similar, the system will keep generating content that sounds repetitive - not because it is stuck, but because it is following your input data too closely. Fortunately, you can balance consistency with creativity by using a few built-in tools and smart habits.
1. Use the Feature History to Manage Versions
Right below the Keywords box, you will find the Feature History section. Every time you update your keywords or the system refreshes them, a version snapshot is saved. You can flip through previous versions and compare how each one influences your topic flow.
For example, one version might focus heavily on SEO-related keywords, while another might emphasize content planning or marketing automation. Switching between versions occasionally helps space out similar ideas and keeps your publishing calendar more diverse. It is like having multiple content strategies ready to deploy - just choose the one that fits your tone or goals for the week.
When your blog titles or topics start to sound familiar, open Feature History, browse older keyword sets, and pick a variation that explores a slightly different angle. This small adjustment can dramatically change the direction of your upcoming posts without forcing you to rewrite anything.
2. Broaden or Shift Your Keyword Angles
The AI relies on your keyword list as its creative foundation. If those keywords are too narrow or repetitive - for instance, all containing the word SEO - it will naturally produce posts that orbit the same subject.
To introduce variety, change your keyword category or angle slightly. Swap SEO for content strategy, copywriting, or organic reach. Try longer, more specific phrases such as building traffic through social sharing or content frameworks for new stores. Long-tail keywords tell the AI to look at your topic from a different perspective while still staying relevant to your niche.
Refreshing your keyword angles every few weeks keeps the content pipeline dynamic and prevents saturation around a single theme.
3. Alternate Channels to Space Out Similar Content
If you want to automate variety without manually flipping keyword versions each day, use a simple scheduling trick: create a second channel.
Set the new channel to publish on alternate days - for example, Channel A posts Monday, Wednesday, and Friday, while Channel B posts Tuesday, Thursday, and Saturday. Give each channel a slightly different keyword focus or tone, such as tutorials for one and case studies or insights for the other.
Because each channel maintains its own schedule and keyword history, Trafficontent automatically alternates between them, ensuring your overall output feels fresh even if each channel runs on autopilot.
4. Keep a Healthy Mix of Consistency and Exploration
Consistency builds authority, but variety keeps readers engaged. The combination of Feature History, keyword diversity, and alternate channels gives you full control: you can maintain your brand voice while letting the AI explore new ideas and directions.
A few minutes spent rotating versions or updating keywords can make the difference between repetitive content and a vibrant, evolving blog strategy.
Experiment, review, and adjust - the system is designed to grow with you.
Guide: Preparing Your Website for SEO-Optimized Auto Content
Trafficontent now includes full SEO metadata inside every content payload. With a few adjustments, your website can automatically parse, display, and benefit from the structured SEO data the AI generates, turning every article into a search-optimized, interlinked page.
This guide walks through each part of the SEO payload - tags and categories, meta titles and descriptions, plus FAQ and schema with internal linking - and explains how to make your site ready to accept and display them properly.
1. Tags and Categories: Structuring Your Blog for Clarity
Tags and categories help both readers and search engines understand the structure of your site. They organize your content into logical themes and make internal linking easier. Trafficontent now automatically includes tags and category data in every content payload.
Here is how to make the most of it:
- Go to Advanced Settings -> Customize in your dashboard.
- Choose 3 to 5 core categories that define your niche.
- Save the selections so new articles map to those categories instead of random ones.
Example category set for a marketing blog:
- SEO
- Content Strategy
- Automation Tools
- Analytics
- Social Media
When you publish a new post, make sure your website template or CMS parses the categories and tags fields from the payload and displays them, often near the title or at the end of the article. These metadata elements signal topic relevance to Google and improve crawlability for internal links.
2. Meta Titles and Descriptions: Instant SEO Control
Every Trafficontent article now ships with Meta Title and Meta Description fields. The AI writes these based on the article's keyword and topic focus.
Use them in either of two ways:
-
Automatic integration: If your template parses the payload, populate the HTML head tags directly.
<title>{{ post.meta_title }}</title> <meta name="description" content="{{ post.meta_description }}"> - Manual use: Copy and paste the values from the content page inside your dashboard when you publish.
Consistent, keyword-rich meta tags improve search click-through rates and ensure that Google shows the message you want readers to see in search results.
3. FAQ Schema and Internal Linking: Building a Network of Relevance
FAQ blocks and internal links are the next level of SEO automation inside Trafficontent. They help your site earn rich results and grow topical authority by interconnecting your posts.
FAQ schema: Parse the FAQ items and output them as JSON-LD or as an on-page accordion.
<script type="application/ld+json">
{{ post.faq_items_json }}
</script>
Or render visually:
<div class="faq-section">
  {% for faq in post.faq_items %}
    <details><summary>{{ faq.question }}</summary><p>{{ faq.answer }}</p></details>
  {% endfor %}
</div>
Internal linking: Connect posts that share a tag by using its slug.
<a href="/tags/{{ tag.slug }}/">{{ tag.name }}</a>Interlinking builds a web of relevance that helps search engines understand relationships between your topics - an essential factor in higher rankings.
4. Making It Work Together
Once your site reads these fields from the API or content file, each post will publish with:
- Smart categories and tags
- SEO-optimized meta title and description
- FAQ and schema data ready for rich snippets
- Automatic internal links between related topics
Your blog will evolve into an interconnected, structured SEO ecosystem where every post boosts the visibility of the others. Spend a few minutes ensuring your CMS templates read these fields correctly and your site will benefit from Trafficontent's SEO intelligence with no manual optimization required.
Guide: The Power of Internal Links
If your website already has a solid library of articles, usually 100 or more blog posts, you have a strong enough foundation to make internal linking one of your most powerful SEO tools. Internal links are the invisible threads that connect your content, helping readers discover more of your work while signaling to search engines what your site is truly about.
That is why Trafficontent enables automatic internal linking starting with the Professional plan. This is the stage where your content base is large enough for internal links to create real SEO momentum.
Why You Should Have Internal Links
Internal links deliver three core SEO and engagement benefits:
- They distribute SEO power. Every page earns authority over time, and internal links let that authority flow between articles. If your top-performing pages link to newer ones, they pass some of that trust along.
- They strengthen topical relevance. When your articles naturally reference each other, such as Shopify SEO, AI content automation, and keyword optimization, it signals that you cover the topic in depth.
- They keep readers engaged. Good internal links extend the reader journey, reduce bounce rate, increase time on site, and strengthen user trust.
Why Longer Content Makes Internal Linking Work Better
Internal linking needs space and context. Short posts often lack enough substance to reference other pages without sounding forced. When your article runs longer, usually 1,800 to 2,500 words, you naturally explore more subtopics, questions, and examples.
That deeper coverage unlocks stronger linking opportunities:
- More anchor opportunities. Longer articles include more paragraphs, headings, and variations of key terms, so the linker can connect relevant topics naturally without repetition.
- Stronger semantic context. Google analyzes the surrounding text to evaluate link relevance, and longer sections give each anchor richer context.
- Higher reader retention. When readers find helpful in-text links throughout a detailed guide, they stay longer and consume more pages.
- Reduced self-link risk. Longer content dilutes repetition and allows smarter, more diverse linking.
In short, the longer the post, the richer the internal linking possibilities, and the more natural those links feel to both humans and search engines.
Best Practices for Internal Linking
- Use natural anchor text. Link phrases that fit the sentence and avoid empty prompts like click here.
- Limit links per article. Around 6 to 10 links is often enough. Too many can look manipulative and too few waste opportunity.
- Never self-link. Linking to the same article confuses crawlers and wastes link equity.
- Link within topic clusters. Guide readers logically from beginner content to more advanced pages.
- Keep links updated. Remove broken ones and replace outdated URLs with fresh content.
Why It Is Included in the Professional Plan
Automatic internal linking works best when your site already has a critical mass of content, typically 100 or more articles across related categories. Below that threshold, links tend to repeat or self-reference and offer limited SEO benefit.
That is why Trafficontent activates automatic internal linking for Professional and Enterprise plans only. At that level, the AI has enough posts, keywords, and topical variety to build smart, natural connections across your site.
Internal links turn your content library into a connected ecosystem. With Trafficontent's Professional plan, longer content and smart internal linking work together to give your website the structure and authority it needs to rise above the competition.
Guide: Why Email Marketing Is Critical to Your Funnel, Customer Relationships, and Conversions
Email marketing remains one of the most powerful and cost-effective tools for nurturing leads and building long-term customer relationships. While social media and ads capture attention, email builds trust and drives real conversion.
This guide explains why email marketing is essential to every growth funnel, how to design it effectively, and how to integrate it with your Trafficontent automation.
1. Why Email Still Outperforms Every Channel
Despite the explosion of social platforms, email consistently delivers one of the highest returns on investment across digital marketing channels.
Key reasons include:
- Direct communication. No algorithms stand between your message and the subscriber inbox.
- Ownership. You control your list, unlike followers or ad audiences that can disappear with platform changes.
- Personalization. Each message can adapt to subscriber names, history, and interests.
- Retention. Regular touchpoints keep customers engaged and encourage repeat visits.
In short, social media builds visibility, but email builds loyalty.
2. How Email Fits into Your Marketing Funnel
Your marketing funnel has three major stages, awareness, engagement, and conversion, and email can play a vital role in each:
- Awareness: Welcome new subscribers with onboarding sequences that share expectations, weekly tips, or special insights.
- Engagement: Send educational content, case studies, or blog summaries to nurture readers into trusting your expertise.
- Conversion: After building trust, deliver targeted offers such as discounts or product launches to convert leads into customers.
Trafficontent automates these newsletters by pulling recent posts, top articles, or AI-summarized content directly from your blog.
3. Personalization and Segmentation: The Core of Relationship Building
Modern email marketing is not about blasting the same message to everyone. Segmentation divides your audience into groups based on behavior, demographics, or funnel stage so you can customize tone, topics, and offers.
Examples:
- New subscribers: Send educational sequences that introduce your brand.
- Loyal readers: Share early access to updates or product releases.
- Dormant users: Reactivate them with we miss you messages and refreshed value.
Trafficontent supports dynamic segmentation through newsletter templates and credit-based automation so you can scale personalization without manual effort.
4. How Email Drives Conversions
Every email you send can move readers closer to action:
- Blog updates: Bring traffic back to your site and boost SEO metrics.
- Product highlights: Drive sales with timely reminders or limited offers.
- Educational tips: Keep users engaged between purchases and reduce churn.
- Post-purchase follow-ups: Request reviews, upsell accessories, or cross-sell related services.
Linking emails to your blog or product pages creates a consistent flow of qualified traffic. Over time, repeat exposure turns weekly readers into loyal customers and advocates.
5. Best Practices for Email Success
- Stay consistent and send at predictable times so subscribers know when to expect you.
- Use clear calls to action so each email pushes one primary next step.
- Keep it human and conversational, as if you are writing to one person.
- Optimize for mobile because most emails are opened on phones.
- Test and track open, click, and conversion rates so you can refine timing and content.
Trafficontent's integrated email system can auto-populate newsletters with new content, attach AI-written subject lines, and run simple A/B tests.
6. Turning Email Into a Growth Engine
Think of email not as a broadcast tool but as an ongoing dialogue. When your emails deliver consistent value, readers begin viewing them as a trusted resource rather than marketing.
By combining Trafficontent's automated content creation with smart email sequences, you can maintain engagement, strengthen customer relationships, and turn your funnel into a self-sustaining growth engine.
Start small, stay consistent, and let each send quietly turn attention into action and action into loyal customers.
Guide: Email and Newsletter Automation - Scheduling, Setup, and Multi-Channel Launching
Email and newsletter automation turns your content system into a self-running communication engine. Instead of manually drafting and sending campaigns for each product, store, or website, you can set up Trafficontent's automated email scheduler to handle everything.
This guide walks through the setup step by step and explains how the system runs across audiences and channels.
1. Import or Add Your Subscriber Email List
Start by bringing your audience into the system. You can import an existing list or add subscribers manually.
-
Importing a list:
- Upload a CSV with names, email addresses, and segments.
- The system validates duplicates and cleans the list to protect deliverability.
- Map columns such as Name, Email, Segment, and Language to keep personalization aligned.
-
Adding subscribers manually:
- Go to Email Dashboard -> Subscribers -> Add New.
- Enter contact details or paste multiple emails at once.
- Assign tags such as Shopify Customers, Blog Subscribers, Premium Members, or Trial Users.
Every subscriber syncs automatically with your store or channel so you can target messages by platform, category, or customer type later.
2. Create a New Email or Newsletter
Click New Email to start crafting your automated message. You can either:
- Start from scratch: Write your own copy and let the AI assistant refine tone, clarity, or formatting.
- Auto Generate: Pull in recent blog posts, product highlights, or trending topics for a ready-to-send newsletter.
Use placeholders like {{NAME}}, {{LATEST_POST}}, or {{CTA_URL}} to personalize every message automatically.
3. Magic Rewrite and Template Auto-Fill
Magic Rewrite is your AI assistant inside the editor. Instantly refine messaging for tone, readability, or conversion goals.
- Rewrite in different tones such as professional, friendly, informative, or sales-oriented.
- Shorten or expand content depending on campaign goals.
- Auto-fill from templates such as product announcements, weekly digests, special offers, or onboarding sequences.
Combine Magic Rewrite with blog integration by choosing Autofill from Latest Posts. The editor pulls titles, summaries, and links from your latest articles.
4. Create Email Launchers for Multi-Task, Multi-Channel Campaigns
Email launchers coordinate tasks across multiple stores, websites, and channels. Each launcher can:
- Handle multiple subscriber groups such as Shopify customers or WordPress subscribers.
- Send to multiple platforms including newsletters, blog subscribers, and store notifications.
- Manage multiple niches at the same time.
- Include automatic A/B testing and multi-language variations.
Set triggers such as:
- New blog published
- New product launched
- Scheduled event such as daily, weekly, or monthly
Once activated, the launcher generates the right version for each channel and publishes on schedule with no extra clicks.
5. Scheduling and Automation Flow
Trafficontent's scheduler helps your emails go out when engagement is likely to be highest:
- Select Send Now, Schedule, or Recurring.
- For recurring sends, choose the frequency, such as daily, weekly, biweekly, or monthly.
- Select the time zone or sync with your store's local time.
- Preview and confirm the email sequence.
The system handles queuing, throttling, and retries automatically.
6. Multi-Store and Multi-Channel Integration
Manage multiple websites or stores under one dashboard. Each becomes a channel, and launchers can target specific channels or broadcast to all.
Example:
- Channel 1: Shopify Store A -> Promotional newsletters
- Channel 2: WordPress Blog B -> Weekly educational digest
- Channel 3: Shopify Store C -> Product release updates
All can run from the same launcher. Trafficontent rewrites tone and calls to action automatically so messaging fits each audience.
7. Monitor, Analyze, and Refine
Track performance directly inside your dashboard:
- Open and click-through rates
- Top-performing templates
- Conversion rates by channel or segment
- Best send times by region
The AI recommends optimizations such as tone adjustments or subject line updates to keep engagement high.
8. The Seamless Experience
Once everything is set up, the workflow runs on its own:
- Subscriber lists update automatically from store activity.
- New content triggers a Magic-Rewritten email.
- Launchers distribute to the right lists and stores.
- The scheduler dispatches at the best time with the right language.
- Reports flow back to your dashboard for review.
One unified system keeps messaging consistent, audiences informed, and conversions growing so you can focus on creating value instead of micromanaging campaigns.
In short, email automation turns complex communication into a smooth, scalable process. Whether you run one website or ten, Trafficontent's launchers, Magic Rewrite, and smart scheduling help your message reach the right audience on the right day in the right voice.
Guide: How to Use Campaign Cycles and Campaign Numbers for Smarter Email Automation
Email marketing works best when it is consistent, strategic, and automated. Instead of sending one-off blasts, Trafficontent's campaign cycles and numbered emails organize your outreach into repeatable, data-driven flows.
Use campaign cycles to define the rhythm of your communication and campaign numbers to keep every touchpoint organized, traceable, and measurable.
What Is a Campaign Cycle?
A campaign cycle represents one complete round of your marketing communication, such as a seven-day onboarding series, a monthly newsletter run, or a product launch countdown.
Think of it as an automated timeline the system follows every time a subscriber enters the flow:
- Day 0 - Trigger such as a new subscriber, launch announcement, or blog update
- Day 1 - Welcome email
- Day 3 - Educational or tutorial content
- Day 5 - Product offer or discount
- Day 7 - Wrap-up or reminder
Once a user qualifies for the cycle, the platform sends the entire series automatically and you do not need to restart it manually.
What Is a Campaign Number?
Each cycle contains multiple campaign numbers, serial identifiers that represent individual emails inside the same automation. This keeps every send organized:
- Cycle 1.1: Welcome to our brand
- Cycle 1.2: How to use your dashboard
- Cycle 1.3: Tips for getting results
- Cycle 1.4: Invite a friend or upgrade offer
Campaign numbers let the system pause or resume flows when someone unsubscribes or upgrades, prevent duplicate sends, and produce performance analytics for every stage.
How to Set Up an Automated Campaign Cycle
- Choose the cycle type. In your dashboard, go to Email -> Campaigns -> New Cycle and select a goal such as Welcome Series, Product Launch, or Content Newsletter.
- Define your schedule. Set the entry trigger and timing, for example every two days. Each email is aligned automatically with its campaign number.
- Create serial emails. Write or auto-generate every message under its campaign number, such as 1.1, 1.2, or 1.3, and reuse templates and dynamic tags like {{ FIRST_NAME }} or {{ LAST_BLOG_TITLE }}.
- Enable automation. After saving, the cycle runs continuously. New subscribers enter at Campaign 1.1 and move through the series without manual sends.
- Monitor and optimize. Review open rates, clicks, and conversions per campaign number to refine timing, content, or offers.
Why Campaign Cycles Matter
- Consistency: Keeps your audience nurtured automatically.
- Personalization: Delivers the right message at the right time for every user.
- Scalability: Handles 100 or 100,000 subscribers without extra effort.
- Clarity: Campaign numbers make tracking and A/B testing straightforward.
- Automation: The system sends, tracks, and repeats the entire flow hands-free.
In short, campaign cycles give your emails rhythm and campaign numbers give them structure. Together they create a predictable automation engine that turns one-time visitors into long-term customers without you manually pressing Send.
Save time and money with Traffi.AI
Automating your blog
Still running Facebook ads?
70% of Shopify merchants say content is their #1 long-term growth driver.
(paraphrased from Shopify case studies)


Guide: Boosting SEO and Traffic with Social Media Fan-Out and Link-Back Strategy
Social media is not just for engagement anymore. It is now an essential part of your website's SEO and traffic engine. With Trafficontent's social fan-out feature, every article you publish can automatically generate optimized social posts that link back to your site.
This guide explains how to set up and maximize your social fan-out link-back strategy so each blog post becomes a hub of multi-channel visibility.
1. What Fan-Out Means
Fan-out means distributing one piece of content to many channels automatically. When a new article goes live on your site, Trafficontent can generate and push social-ready snippets to:
Each post includes an optimized caption, recommended hashtags, and most importantly a link back to your website. The process multiplies your reach while keeping tone, branding, and calls to action consistent.
2. Why Link-Backs Are Crucial for SEO
Search engines interpret social signals as trust indicators. When people share or interact with links that point to your domain, it helps your content appear more authoritative and current even if most social links are marked no-follow.
Fan-out delivers secondary SEO benefits such as:
Each shared post becomes a content ambassador that returns traffic to your site while feeding valuable engagement data into your analytics.
3. Setting Up Fan-Out in Trafficontent
All fan-out posts automatically embed your article's canonical link so visitors land back on your domain, never on a third-party shortener.
4. Link-Back Optimization Tips
5. Scheduling and Rotation
To avoid audience fatigue, rotate between educational, story-driven, and promotional captions. Pair this with alternate-day channel scheduling so activity stays constant but balanced.
6. The Compound Effect
Once your social accounts are wired into fan-out, every article sparks a ripple effect:
Over time, this network of interconnected content builds a feedback loop of visibility and authority. Set up fan-out once and your content works for you everywhere, every day.